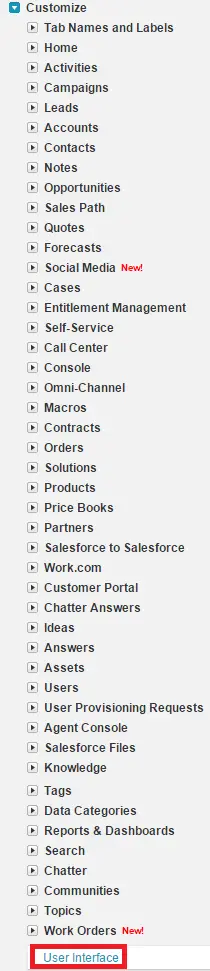
1. Go to User Interface.
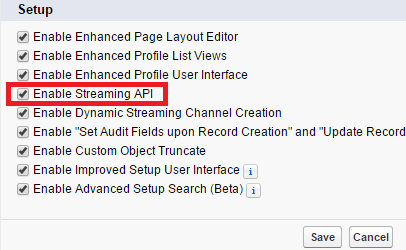
2. Enable “Streaming API”.
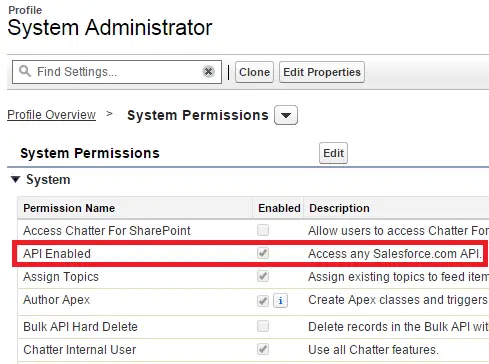
3. Check whether your profile has API Enabled permission.
4. Go to this site and download the file – http://download.cometd.org/cometd-2.2.0-distribution.tar.gz
5. Extract the downloaded file.
6. Open Command Prompt and execute the below commands;
cd cometd-2.2.0/cometd-javascript/common/target

jar xvf cometd-javascript-common-2.2.0.war org/cometd.js
Note:
In command Prompt, make sure you navigate to the drive where it has been extracted.
7. Go to D:cometd-2.2.0cometd-javascriptcommontargetorg path. You will be able to find cometd.js file.
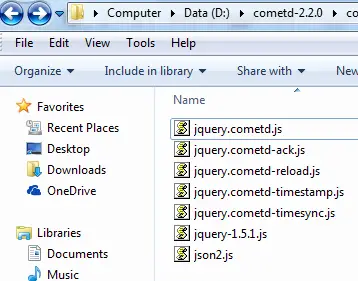
8. Go to D:cometd-2.2.0cometd-javascriptjquerysrcmainwebappjquery path. In my case I extracted the file to D drive. You will be able to see the files as below:
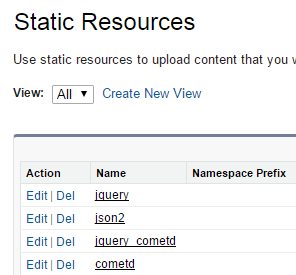
9. Go Static Resources and create new Static Resources as below in Salesforce
File Name Static Resource Name
cometd.js cometd
jquery-1.5.1.js jquery
json2.js json2
jquery.cometd.js jquery_cometd
10. Code for Visualforce and Apex.
Visualforce Page:
<apex:page controller="StreamingAPIController">
    <apex:includeScript value="{!$Resource.cometd}"/>
    <apex:includeScript value="{!$Resource.jquery}"/>
    <apex:includeScript value="{!$Resource.json2}"/>
    <apex:includeScript value="{!$Resource.jquery_cometd}"/>
    <script type="text/javascript">
    (function($){
        $(document).ready(function() {
            // Connect to the CometD endpoint
            $.cometd.init({
               url: window.location.protocol+'//'+window.location.hostname+'/cometd/24.0/',
               requestHeaders: { Authorization: 'OAuth {!$Api.Session_ID}'}
           });

           // Subscribe to a topic. JSON-encoded update will be returned
           // in the callback
           $.cometd.subscribe('/topic/AccountUpdates', function(message) {
               callRefresh();
            });
        });
   })(jQuery)
   function disconnect() {
       $.cometd.disconnect();
   }
   window.onbeforeunload = disconnect;
   </script>
   <apex:form >
   <apex:actionFunction name="callRefresh" action="{!refresh}"/>

<apex:pageBlock >

    <apex:pageBlockTable value="{!listAccount}" var="a">

        <apex:column value="{!a.Name}"/>

        <apex:column value="{!a.AccountNumber}"/>

    </apex:pageBlockTable>

</apex:pageBlock>

</apex:form>
</apex:page>
Apex Controller:
public class StreamingAPIController {
    public StreamingAPIController() {
    }

    public List<Account> getlistAccount() {
        return [SELECT Id, Name, AccountNumber FROM Account WHERE Active__c = true];
    }

    public PageReference refresh() {
        getlistAccount();
        return null;
    }
}
11. Create a PushTopic using the below code in Developer Console.
PushTopic pushTopic = new PushTopic();
pushTopic.Name = 'AccountUpdates';
pushTopic.Query = 'SELECT Id, Name, AccountNumber FROM Account WHERE Active__c = true';
pushTopic.ApiVersion = 36.0;
pushTopic.NotifyForOperationCreate = true;
pushTopic.NotifyForOperationUpdate = true;
pushTopic.NotifyForOperationUndelete = true;
pushTopic.NotifyForOperationDelete = true;
pushTopic.NotifyForFields = 'Referenced';
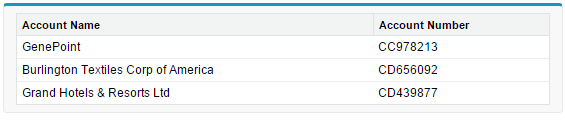
insert pushTopic;12. To test it, open the visualforce page. Open Accounts tab and create a new account with Active check box true. If you go back to the Visualforce page, the account created will be displayed there.